After nearly 20 years in big Tokyo I was feeling burned out in my not-so-successful "career" in the service industry, knocking on several ceilings....so after a chance discovery of cheap old farmhouses we set out towards the countryside - but still close enough for my wife to further pursue her working live, commuting by Shinkansen while I would take care of the house and kids and build my own little cafe at home...
Our first bump came when we realized that the bank wasn't willing to give a loan for an old rundown house on some worthless property in the "Hinterland". So, we changed plans and will be building a new house. We already bought the plot last year, with about 400 square meters size, and I have started the vegetable garden beforehand, next project will be the garden house.

25 December, 2011

Christmas Dinner at Home

This year is one of the very few times I actually am not working around Christmas. In Tokyo, December used to be the busiest time of the year where everyone suddenly seems to have money to spent again with year-end-parties big and small plus Special Dinner offerings around Christmas, 95% of them couples. So the 24th is not a public holiday the 23rd is, as it is the Emperor's birthday. And even here in Karuizawa, which is preparing for winter from November onwards and goes into "hybernation" (冬眠中, touminchu. I've actually seen shops putting this sign out to show they are on winter break. And it's a common word among the many part-time workers about what they will do in winter, as many will take an non-voluntary extended holiday from January up to the middle of April. Only few are willing to drive on snowy roads to work at ski-resorts or feel enough financial strain to engage in lower jobs like room cleaning in one of the many hotels around here.), Christmas means mostly work, depending on which day of the week it falls. So I decided to do a very common Christmas dish, roasted chicken and gathered information on the internet during the last days. Luckily I chanced on a helpful food-program last week which had chicken stuffed with rice, roasted in a cast-iron pot. Since I wanted to have Hannah eat the same food too, I decided against their flavouring with raisins and marons, but instead opted for a more gentle basil-flavour, took the idea of using sweet potatoes(amongst the usual ones) for the vegetable bed from another blog, and from "Simply Recipes" I got the idea of a honey glaze since I didn't want to use garlic butter. I later returned again to this blog to also find some tips about using the leftovers and bones to make some chicken stock.
I started by cutting some celery into small slices and sauteed them in olive oil in the cast-iron pot. I thew in some sun flower seeds as well and after they where browned I scraped the mixture into a bowl.
  To this I added cooked, warm rice, parsley, dried basil and seasoned it with salt and pepper.
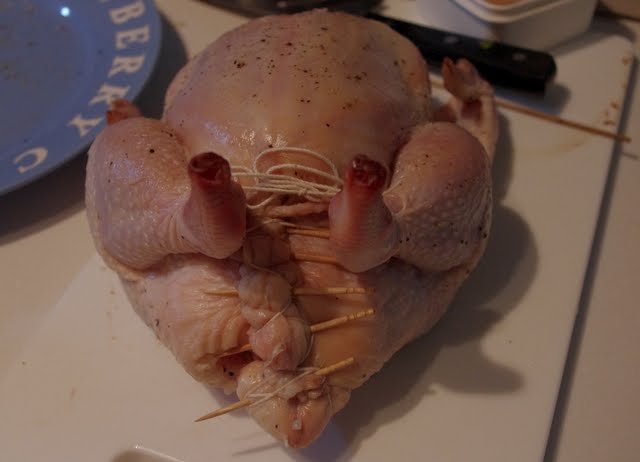
I had prepared the chicken already a few hours ahead by washing the outside and inside with cold water and patting it dry. It was then left on the counter to gain room temperature and for the skin to dry for a crispier finish (which didn't finalize as much as hoped for). I stuffed it with the rice and tied the opening with tooth picks which I secured with some string that followed to tie the legs together. I than rubbed salt and pepper on the whole of the outside and put it on a bed of vegetables for which I used roughly chopped onion, carrot, turnip, and aforementioned sweet potato. Some recipes suggested sauteeing the vegetables first which I dutifully did, because I only have a rather small sized microwave oven and since the pot would stand on the bottom I worried the vegetables wouldn't get enough heat, which turned out to be far off the mark.

I preheated the oven to 270 degree and put in the pot with the chicken breast downwards. After 40 minutes I lifted the iron pot out and turned the bird breast facing up. At this point I brushed the now up facing breast part generously with honey.
 Around 15 min later I turned down the heat to about 180 degrees and roasted it for another 45 min until the  digital temperature reader showed that the inside of the meat had risen to about 75 degrees.
After lifting the bird onto a dish for cutting I realized that a few of the vegetables had been burned black, but enough was left, also these where extremely soft, with the sweet potato tasting the best. I had worried in the beginning that not giving any soup or liquid into the pot might just burn the vegetables, but the chicken dropped off quite some liquid, which was more than enough. It was rather the sidewalls of the cast-iron that became too hot and burned some of the greens. And the breast skin didn't turn out as crispy as I had hoped for. Next time I will turn the bird earlier and lower the temperature earlier too which might help. I also would brush the skin before roasting with olive oil.

What did turn out very nicely was the soft tenderness of the meat, totally different from the usual fry pan cooking, we hardly needed any knife. And the stuffing of rice was just delicious as well.

The arrangement on the plate might look rather rough, nevertheless the taste was great! Hannah enjoyed the food as well, shoving the rice happily into her mouth with her hand.


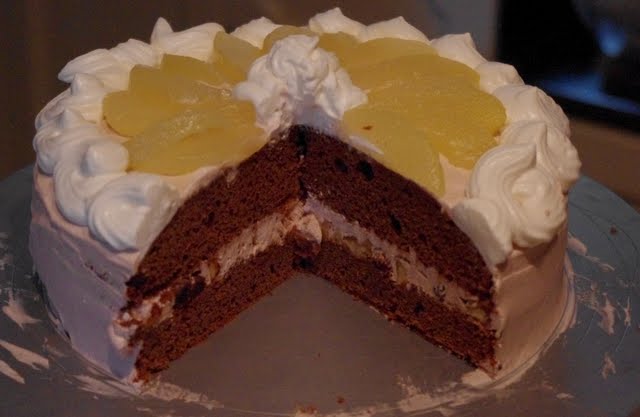
For dessert I had prepared a chocolate cake, Sachertorte, but spiced it with cinnamon, clove, cardamon and nutmeg. I sliced it once and filled it with roasted walnuts and rum-raisins (that are always at hand in the fridge in this house) . I also had planned to put in some sliced pears as well but totally forgot about it. And so they made part of the topping, together with some whipped cream.

08 December, 2011

Making Progress- with Detours

Last week our little Hannah, now 1 year two months old, came down with high fever that was finally diagnosed as three-day-fever, roseola.  It is one of those diseases that little kids go through once and than the body becomes immune. Nevertheless it is heartbreaking to see such a lively happy little kid become weak and listless, not having much appetite either. So I stayed at home the whole week, tending to her or holding her while she was sleeping in my arms.

It looks like winter is marching towards us and I still haven't finished the front side of the garden house! I worked on it this week and finished the two brick compartments. It didn't turn out quite the way I had imagined, but it still looks good enough to me, and to the unknowing Japanese it looks even better. I had drawn up some designs beforehand, but when starting I realized that these bricks where not in a 3 to 1 width to height that I had thought them to be, poor measurement and mathematics on my side. It's been more than 20 years that I did masons work, so there are a few things I don't remember or only half.

But for some reasons I still remembered how to make these "mason's corner" to stretch a string across to follow after without having to drive nails into the wood.

On Tuesday, I had a "detour": close to our plot is a piece of land where people can leave cut-off tree trunks for other persons to take home and make into fire wood. This year it had been empty the whole time but driving by it in the morning I saw lot of trunks there. So I emptied our car, fit in a blue-sheet and started hauling of the pieces I could handle. And than my eyes fell onto a beautiful tree stump, nearly square at the bottom, about 1m in height where it was going off into two trunks. It looked perfect for a chop block! Only problem was how to get it into the car, as it was probably above 100 kg in weight. I nearly gave up on it but than had the idea of building a ramp out of the thinner trunks lying around. So I started "rolling" the beast towards it and than slowly up. Real slow, because every push felt like having to fight a Sumo ringer with my feet slipping and me fast running out of breath.

Finally I had it on top, put a heap of logs to the side to stand the stump up on which was another battle in itself, backed the car up against it and pushed it inside, more or less, because the widening bottom was impossible to get in. With the stump looking out of the back I slowly drove it to the far end of the garden and heaved it out again. Using a long trunk as a lever I was able to push it of the road, but there are still another slightly uphill 10 meters until its final place...

And yesterday I had the second "detour" of this week, when my friendly neighbor came over and suggested to cut off the high weed that was still covering most of the garden with his engine-powered weed-cutter. These are a very common sight to see also I personally had never used one before. So he started at the sides (as fire control in his words) and after I had seen it in action, I took over and cut off the whole stuff. In many places it had been about 1.5 meters high, leaving the Garden House nearly unseen from the road, but now that the plot lies barren, the house is easily spotted from afar.

Having finished the brick works I cleaned the inside today and lay some floor boards I had gotten from the near by guest house as it was being demolished. They had been used as a outside wall covering, heavily painted on. So I put the outside on the bottom and had the raw inside facing up, which also worked quite nicely with the bends. They are single grooved, making them stick together very smooth.
And finally I can walk inside the house without worry to crash through the floor!


25 November, 2011

Hannah update

In letzter Zeit habe ich so viel über das Gartenhaus, Herbst hier, Essen usw geschrieben das es jetzt schon einige Zeit her ist, seit ich Bilder von Hannah hier reingestellt habe. Dem soll hiermit Abhilfe geschaffen werden, also wenig Text aber viele Bilder. Das neueste ganz oben. Ach ja, ein wenig laufen kann sie auch schon, aber noch keine Gelegenheit gehabt, sie dabei zu fotografieren, wird nachgeholt.
最近、ガーデンハウスや料理のポストばっかり書いたので、華和ちゃんの写真はぜんぜんアップして``なかった。ここで、最新のキュートな笑顔をまとめてあります。
 Spaziergang zum nahegelegenen Shoppingcenter. Da aber grade Schlußverkauf war passte der Kinderwagen nicht ins Geschäft rein..
先週末はアウトレットでプラチナバーゲンありました。そのため、ベビーカーはお店の中に入らなかった。
Hannahs Augen sind immer noch so groß, und zum-Dahinschmelzen-gucken schafft sie auch noch ohne Probleme
華和ちゃんの目はあいかわらず大きくて丸い。溶けそう…
Neulich beim Kekse essen.
このあいだ、クッキーを食べたとき

Neulich nach dem Kekse essen.
そして、食べ終わった。

Im Shinkansen unterwegs mit Papas Mütze, auch wenn kaum eine Kopfbedeckung länger als 5 Minuten auf dem Kopf bleibt.
新幹線に乗って、パパの帽子をかぶった。と言っても、長くてでも5分で取っちゃう。

Sportveranstaltung in Tokyo, Mittagessen auf der Tribüne
東京のスポーツイベントを参加して、ただいま昼ご飯中。

Hannah genießt die U-Bahn in Tokyo, zum Glück ist es am Wochenende ja nicht so voll
地下鉄を楽しんでる。週末ですから、混まなくてよかった。

Hannah und Hiromi in der U-Bahn
ママも楽しそう。

Abends im Hotelzimmer
夜、ホテルの部屋で靴の”お片付け中”

16 November, 2011

Climbing up a tall rock

The name of this mountain is "Takai-iwa", "tall rock", very fitting as it sits towering above the highway entrance of Karuizawa. Thus I had seen it many times but never realized that there was a way to climb it. It doesn't appear in any of the many guide books about Karuizawa, as it seems to be unfitting for a "Resort town" with a big shopping mall to engage in serious outdoor sports. 

The mountain can be climbed from two sides of which I choose the south side. As there is no parking space at the entrance to the hiking path from a narrow road I left my car a bit away and thus got a glimpse of this autumn combination of flaming red maple leafs and a tree without any leafs but lots of bright persimmon fruits.


After hiking through some forest and then upward between big boulders the climb became steep up a ravine of sort with rocks that looked as if formed by concrete and stones but in reality formed during volcanic activity.


The top consists of two big towers with several tops connected by ridges. Autumn had finished at the top and I could thus enjoy an unobstructed view. This one is to the east side with the highway towards the Kanto plain showing in a few places.


And here a view of the late autumn colors of the forests below with Mount Asama sitting at the top
After crossing several ridges I decided to take the front path down with this point being the only kind of challenge. It only doomed to me later that I had somehow missed the biggest challenge, the "chimney" where  one would climb straight up the inside corner of the rock supported by a chain hanging from the top. This place isn't a major attraction, marking of the path with colored plastic bands was scarce and the bottom was totally covered with fallen leaves, making it even more difficult to spot the trail.


When taking pictures from the bottom a flash from the very top caught my eye and I realized two persons standing (!) on the flat top of the highest tower taking in the 360 degree view in disregard to any vertigo and the cold wind that was blowing. I knew than that the small path I thought would end at a small water outlet actually led further on to the "chimney"! But altogether I was done in two hours, so a "revenge" is coming up for sure.


15 November, 2011

The Wall


After more than 20 years I am mixing mortar again and holding a  trowel in my hand - and it feels good. The smell and sound support my memories, I automatically do the movements I had done so many times during my 3 years of apprenticeship as a mason, which was serving as the base for the  architectural college study I entered afterwards; but that lasted less then 2 years before I quit and went off to Japan...

I was happy with the trowel, even in Germany there are different shapes depending on the region and here in the home center I had the choice between a rounded heart shape and the delta. So smaller in size I felt comfortable with the straight edge and the narrow tip as if I had never stopped using it.
Mortar can be purchased as a ready to use mix, but that is more expensive when you are using a lot like I would need. So I purchased a 25kg sack of portland cement and three 20 kg bags of dark grayish sand. I than mixed it dry together before adding the water and started the wall.

I had a bunch of smaller rocks collected from our lot since the beginning, knowing that I would put them to use somehow. But the idea to use them as a base wall came to me only much latter, originally I had planned to  use only red bricks for the lower compartment, hence the mortise below the middle beams in the front wall. And also I had more than enough for this wall I didn't have that much to choose from, so it might look imposing from the front there are a few very thin points which I intend to strengthen with mortar from the back and form a straight base on top for the bricks that will come atop them.
As for the bricks, they are not a common building material because they are very weak to earthquakes and so I had to search around to find some cheap ones. These are actually rather small in size, only about 18 cm long, giving me 4 1/2 lengths for one field. On the other hand this will look nice with only two small fields to fill and gives me more freedom to do some ornamental stuff.

After a few hours of swinging the trowel, slapping the mortar, swapping the stones back and forth to find a nice fit, I was finally done. I used the grout trowel to fill the small holes and flatten the surface of the mortar and after it had fairly dried I used a big brush and lots of water to wash the mortar off the rocks and smooth the mortar lines.


In the garden the broccoli is growing steadily showing not a single caterpillar or other bug after I had sprayed the leafs once, because they had been infested by green caterpillars by the dozen and summer time wasn't the right season for me to look after the garden more than once a week.


Even the cauliflower, which we had planted together with the broccoli was opening up beautifully, can't wait to prepare some nice food with these.

13 November, 2011

Homemade Hazelnuts spread

 When I started this blog I had a multi-themed style in mind and cooking was supposed to be one of it. Alas, the crammed kitchen in our apartment never seemed to be clean enough for taking pictures in it. But after some serious furniture moving and rearranging on the shelf and inside the drawers I feel much more comfortable to do more of these, so enjoy.

Like the vast majority of German people I grew up with "Nutella", the famous creamy hazelnuts-spread or some cheaper imitation. And like probably many Germans I always thought there is something good in it...It was only less than a year ago that American-Pastry-chef turned Parisian book-writer  David Lebovitz had an article on Facebook describing the reality, it's high sugar content and the psychological usage of Football players and whole-grain bread in the commercials, opening my eyes to see through the farce. He also put forward a recipe, which I changed a bit to my liking, and which should only be seen as a basic "mixture", an invitation for you to try and create your very own Nuts'n Chocolate spread.

My basic recipe


Hazelnuts 100 g
Milk 100 ml

Cocoa powder 15ml
Honey 80 g
Bitter Chocolate 60 g
Butter 50 g
Cinnamon


Coarsely chop the nuts and roast them in a pan without oil until they are browned. You can tell by the nice smell that's starting to come out when they start to brown.


Put the roasted nuts in your mixer and blend until very small, occasionally moving the parts in the corners towards the middle.


Meanwhile heat the milk in a medium pot, slowly adding the other ingredients until they are all molten.
Pour this cream into the mixer and blend again until you have a smooth, rather liquid, cream.
Fill the cream into clean jars or other containers of your choice, put in the fridge and let cool for at least 6 hours. This cream is supposed to melt in your mouth, or on your freshly baked toast, but it might be the case that because of a different chocolate or butter-substitute it won't set enough. In this case just mix in a bid more melted chocolate or butter and cool it down again.

Variations, where the Fun starts
Nuts: Try walnuts for less sweetness, almonds for more, peanuts, cashew nuts, different blends, etc whatever you like or have at hand.
Roasting: Same as with caramel, the darker the nuts, the more bitter the taste gets. So, if you like your caramel slightly burned, you might try the same with nuts.
Sweetness: You can use sugar only or a blend of both but be aware that the creaminess might change.
Chocolate: As with nuts, use what you like, dark and bitter, or milk chocolate, or even white.
Spices: My favorite is cinnamon and a bit of clove, or use your flavor syrup. For a "special" taste, add some liqueur into the milk, but beware that the alcohol might not totally evaporate if you don't heat the milk until nearly overflowing.

The spread consists of solid and liquid ingredients that together give the creaminess. Changing the amount of one of these might thus result in a not so perfect cream at the first try, so be sure to have some chocolate or butter at hand if it is to liquid after a few hours in the fridge.


04 November, 2011

Glass cutting

After I got my hand on a pair of old Japanese sliding doors with glass I decided to put these to work for my window instead of the acrylic I had planned. It would be cheaper, only the cutting tool needed to be bought, warmer, and less delicate towards the seasons temperature changes. I had never cut glass before but was thrilled to try it, and a quick how-to search on Google got me started.

The most important thing to know is that you don't get your cut by weakening the glass like in wood, but rather by the tiny wheel of the cutter putting tension/stress on the structure of the glass. The oil for the wheel plays it's part, too (my cutter had a small tank which I filled with some bicycle lubricant). Once cut, you should proceed to break the glass, otherwise the the tension ebbs and the cut "heals" itself.


Make sure that the glass lays on an even, clean surface. You might want to put a few sheets of newspaper under it to soften it a bit. When marking the cut be aware that the cut will be about 2mm away from the ruler, depending on the thickness of the cutter's head.You don't need to put much pressure on the cutter, more than that a stable and smooth motion from start till end will get you a clean cut. Than break the glass over an edge.

Here are my frame parts and the ledge after some painting. The color didn't look as I had imagined and didn't run very smoothly, probably because it was an already older bucket, but in the end everything looked nice together.
The filigree kumiko where of darker wood so I left them like that and they turned out to give the window a rather pleasant appearance, even the height looks just right. And the glass gives the window an old-fashioned look.


27 October, 2011

Into the woods

These past two weeks went too fast...despite not having a job, I always feel that the day is not long enough to get things done. Main reason for this is of course that I will pick up Hannah from day care center around four in the afternoon and spent the next hours entertaining playing with her, preparing her food, feeding her, and preparing our dinner so that the time I am able to work at the garden house is never a "full" day.
Another reason is actual a positive one: last week workers started to demolish a wooden building that had been used as a budget hotel many years ago three lots down from our's. Together with my friendly neighbor I went there and asked whether I could pick up some planks and beams and they ok'd it, since the disposal would cost money anyway. So, since then I have been going there any day I was at the garden house, carrying wood on my shoulder, since our car is not big at all and material comes out only slowly. Also the 3-story structure collapsed neatly into a big pile of mostly wood, most of the sorting is done by hand than. But the friendly leader put aside the planks of the main stairs for me, which will become a nice wood deck and beams for my next structure, a firewood storage place...

I had also carried off two of these sliding doors with the intent to use the glass for my windows. But when carefully hammering the frame open, I realized that I could use the rails and stiles itself very nicely, because the tenons came out rather clean and it would save me the work to cut all the mortises and tenons for the two frames myself. Plus the old wood wouldn't warp and the minutely worked connections would make a stable window frame also I think I might have to drill in dowels inside the corners to prevent sagging.

The rails after disassemblying

A closer look into the mortises reveals that they are not 100% chiseled by hand but rather pre-drilled. Still, a lot of work goes into one door with 8 of these mortises, their respective tenons, 4 smaller pairs for the middle rail and the decorative filigree "kumiko" rails.
This is how the finished window will look in size. I was real lucky in that the glass will fit in height and thus the tenons and mortises on one side are usable like this with using the top and the middle rails and the outer stiles. I just have to shave off half a centimeter each from top and bottom of the rails and cut new tenons on one size to fit with the stile
This is how the house looks now, and most of the stuff stays there. I only take some of the power tools and the big tool box back home with me and "hide" the rest under a big blue tarp. Sure, the plot is at a very minor road and the house opens to a dead-end gravel road. Still, much must be credited to Japanese not stealing ordinary stuff. Of course there is still a chance that some day something is missing, but it is a very minimal one esp here on the countryside.